- Professional Development
- Medicine & Nursing
- Arts & Crafts
- Health & Wellbeing
- Personal Development
2144 Courses
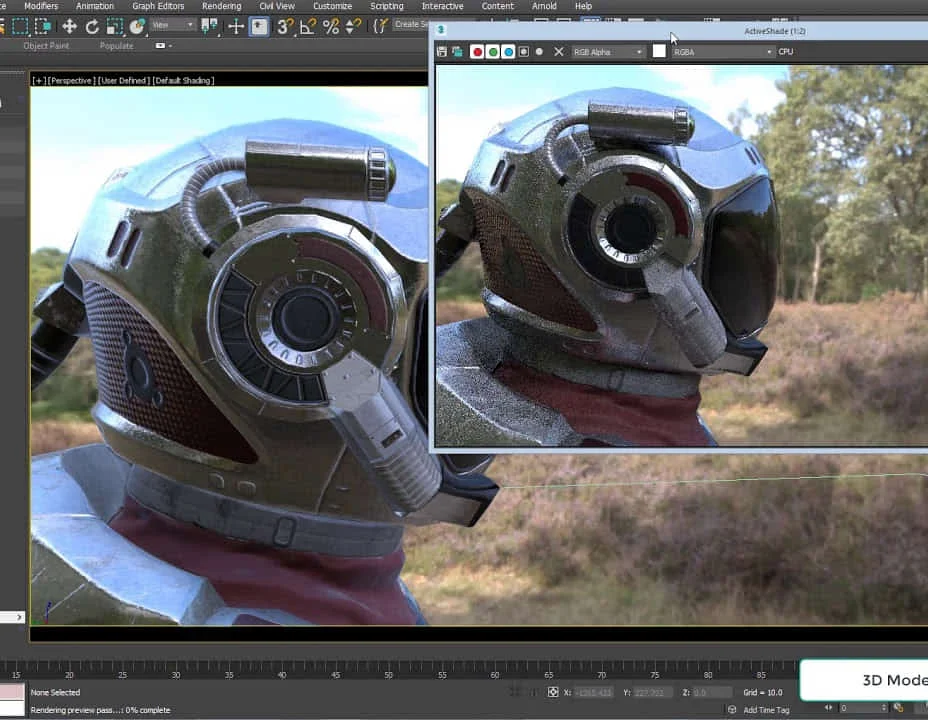
Arnold for 3dsMax Basic to Advanced Training Course
By ATL Autocad Training London
Learn 3ds Max + Arnold Photo Realistic Rendering Workflow. Enhance your skills with our Arnold renderer training for 3ds Max users. Learn to create lifelike 3D scenes and animations, mastering accurate light simulation. Explore essential Arnold features in lighting, materials, and rendering. Click here for more info: Website Training duration: 10 hrs. Method: 1-on-1 and Personalized attention. Schedule: Choose a convenient time from Monday to Saturday, 9 am to 7 pm, and book your slot. Course Duration: 10 hours Course Outline: Session 1: Introduction to Arnold Renderer (1 hour) Unveiling Arnold Renderer's features and capabilities Understanding the benefits of Arnold in 3ds Max Setting up Arnold renderer and exploring its interface Mastering the workflow for exceptional results Session 2: Basic Arnold Shading (1 hour) Navigating the Arnold shading network Creating essential materials with Arnold shaders Working with diverse shader types (standard, Lambert, etc.) Elevating visuals with maps and textures in Arnold's materials Session 3: Arnold Lighting Techniques (1.5 hours) Embracing the art of lighting with Arnold Lights Implementing various light types (area lights, spotlights, etc.) Creating ambiance with Arnold skydome and environment lighting Illuminating scenes using physical sky and image-based lighting Session 4: Arnold Cameras and Rendering Settings (1.5 hours) Mastering Arnold cameras and their settings Achieving depth of field and motion blur effects in Arnold Configuring optimal rendering settings for superior results Fine-tuning rendering with the Arnold Render Setup dialog Session 5: Advanced Arnold Shading (1.5 hours) Creating intricate materials with advanced Arnold shaders Realistic surfaces with Arnold's procedural textures Harnessing the power of advanced shading nodes (bump, displacement, etc.) Unleashing specialized effects with Arnold shaders (subsurface scattering, hair, etc.) Session 6: Arnold Rendering Optimization (1 hour) Streamlining rendering settings for enhanced efficiency Leveraging Arnold features like adaptive sampling and denoising Noise reduction techniques for smoother Arnold renders Troubleshooting common rendering issues and their solutions Session 7: Advanced Lighting Techniques (1 hour) Crafting lifelike lighting setups with Arnold's prowess Exploring advanced lighting properties (exposure, color temperature, etc.) Enhancing lighting with Arnold light filters and modifiers Implementing captivating effects like volumetric lighting and caustics Session 8: Arnold AOVs and Compositing (1 hour) Understanding Arnold AOVs (Arbitrary Output Variables) Configuring and rendering AOVs for post-production control Compositing AOVs for artistic adjustments in post-production Leveraging AOVs for fine-tuning the final image Session 9: Arnold for Animation and Motion Graphics (1 hour) Integrating Arnold seamlessly into animation and motion graphics projects Rendering animation sequences with finesse Managing motion blur and time-based effects with Arnold Unveiling Arnold's potential for particle rendering and dynamic effects Session 10: Arnold Tips, Tricks, and Best Practices (1 hour) Exploring advanced techniques and workflows for exceptional results Optimizing scene setup for enhanced rendering performance Troubleshooting tips for common issues and errors in Arnold Q&A session and final review to consolidate knowledge Upon completing this course, you will: Gain a solid understanding of Arnold, its rendering concepts, and its integration into 3D projects. Master the setup of Arnold renderer, optimizing performance, and ensuring compatibility with various platforms. Effectively create and manage materials for Arnold, enabling you to produce realistic and visually appealing scenes. Demonstrate proficiency in working with different shapes, lighting techniques, cameras, and shaders to enhance the visual quality of your 3D projects. Harness the power of textures to add depth and realism to your rendered scenes. Utilize Arnold scene sources efficiently, empowering you to streamline your workflow and achieve desired results in a faster and more organized manner. Overall, this course equips you with the necessary skills to confidently utilize Arnold in your projects and achieve exceptional rendering outcomes. Arnold is an advanced Monte Carlo ray tracing renderer designed for feature-length animation and visual effects. This comprehensive course equips you with the skills to produce photo-realistic 3D rendered scenes and animations. Learn accurate light simulation, artistic style techniques, and more. Our 3ds Max - Rendering with Arnold training is customizable, offering one-to-one sessions. Whether in-class or live online, our Autodesk Certified Instructors with vast rendering experience will guide you through hands-on exercises and provide a training guide for future reference. Upon completing the course, you'll receive an e-certificate and liftime email support from your Arnold trainer. Prior experience with 3ds Max is recommended, but no prior Arnold knowledge is required. Choose the Arnold version that suits your needs for this training course. Lifetime email support provided. Comprehensive handouts and useful documents included. Flexible financial support options available, including installment packages and funding through job center plus and DWP (Contact us for details). Money-back guarantee: Unsatisfied after your first session? We address your concerns and offer a refund if needed (Terms and conditions may apply). Assistance with computer optimization for improved software performance in Autocad, 3ds Max, and Photoshop on both MAC and PC platforms. Industry connections for portfolio promotion and job opportunities.
Lumion 3d Realtime Rendering Training
By London Design Training Courses
Why Choose Lumion 3d Realtime Rendering Training Course? Course Link Our Lumion Course is best for materials, lighting, and animation skills. Learn high-quality rendering using Lumion's asset library. In-person or live online sessions with lifetime access to recordings and email support. Unleash Lumion's potential for immersive architectural visualizations. Duration: 10 hrs Method: 1-on-1, Personalized attention Schedule: Tailor your own hours of your choice, available from Mon to Sat between 9 am and 7 pm What is Lumion? Lumion is specialized 3D rendering software designed for architects and designers. With Lumion, you can quickly bring your 3D design models to life, add materials, furnish interiors and exteriors, and showcase the impact of lighting and shadows without the need for specialized training. Objectives of the Course The course aims to teach you how to start Lumion projects, add environments, cameras, illuminations, populate scenes with various elements, create terrains, and produce animations. Lumion 3D Course Outline Module 1: Introduction to Lumion 3D Discovering Lumion 3D's capabilities and interface navigation. Learning shortcut keys for efficient workflow. Customizing settings for optimal performance. Module 2: 3D Models and Materials Importing 3D models in various formats. Applying and tweaking materials. Creating procedural materials and glass effects. Troubleshooting common issues. Module 3: Creating a Project in Lumion Building scenes and sculpting terrain. Enhancing realism with alpha and height maps. Module 4: 3D World Managing multiple 3D objects and their properties. Implementing grass and scattering elements. Module 5: Lighting in Lumion 3D Utilizing weather settings for dynamic scenes. Understanding Lumion lights and interior/exterior illumination. Creating 3D reflections and spotlights. Module 6: Realistic Visualizations Incorporating special effects like fire, smoke, and fog. Achieving realism with camera effects and shadows. Rendering still images and animations. Module 7: NPR Visualizations Creating non-photorealistic visualizations with artistic effects. Implementing unique styles for enhanced visuals. Module 8: Artistic Effects in Lumion 3D Exploring conceptual visualizations with painting and sketch effects. Creating cartoon effects and understanding perspectives. Module 9: Animation in Lumion 3D Timing and working with cameras for dynamic shots. Composing animation clips and adding effects. Utilizing layers and control objects for precise control. Module 10: Advanced Features Import and output formats in Lumion. Expanding assets with the 3D model library. Adding animated characters and sound effects. Utilizing the advanced material library. Controlling environment and weather for dynamic scenes. Scene management and movie editing within Lumion 3D. Lumion for Students | Unleash Your Creativity https://lumion.com› product › students Unlock the full potential of your designs with Lumion for students. Request your free 1-year Student license now and bring your visions to life!
NPORS Lift Supervisor Training The aim of the NPORS Lift Supervisor Training is to Provide candidates with underpinning knowledge to allow them to understand the role and responsibility of the Lift Supervisor. As a result of the Lift Supervisor Course, and following successful completion of the NPORS Crane Supervisor training candidates will be able to understand and follow safe systems of work for lifting operations. This Lift supervisor course is for 3 days and can be completed at your site or ours. It is important that all delegates have a good understanding of spoken and written English for NPORS Crane Supervisor Training. NPORS Lift Supervisor Experienced Test Book with Confidence at Vally Plant Training At Vally Plant Training, we guarantee unbeatable value with our Lift Supervisor Experienced Test Price Match Promise. When you choose us, you can book with confidence, knowing that we will not be beaten on price. If you find a lower price for the same NPORS Lift Supervisor Experienced Worker Test, we’ll match it—ensuring you receive top-quality training at the best possible rate. Click for our terms and conditions Your skills, our commitment—always at the best price. NPORS Lift Supervisor Experienced Worker Test is for operators who have received some form of Lift Supervisor Course in the past or alternatively has been working with Lifting equipment, like cranes, Excavators or Telehandlers for a number of years. If you are unsure if you qualify to go down the Lift Supervisor experienced test route please contact our team to discuss this in more detail. Discounts are available for multiple Lift Supervisor Course bookings There are two parts to the lift supervisor test, a theory section comprised of 25 questions and a practical session, however Lift Supervisor training revision notes will be sent once the test has been booked. It is important that all delegates have a good understanding of spoken and written English for NPORS Crane Supervisor Training Crane Supervisor Course Summary: Leading Safe and Efficient Lifting Operations Introduction Ever wonder who keeps construction sites and warehouses running smoothly and safely? That’s where lift supervisors come in. They’re the unsung heroes ensuring everything moves like clockwork. And when it comes to proving you’re the best in the biz, NPORS certification is your golden ticket. It’s not just a piece of paper; it’s your passport to climbing the career ladder. Choose our Lifting Supervisor Course Today. Why Choose Our NPORS Lift Supervisor Training? What makes our training stand out with our Lifting Supervisor Course? Imagine learning from folks who’ve been in the trenches, in training grounds that feel like the real deal, and schedules that bend to your life, not the other way around. We’re not about boring lectures; we’re about getting your hands dirty. Who Should Attend Lift Supervisor Training? Are you the go-to person when things need to get done? Whether you’re starting out or looking to step up, if you’re in the world of construction or logistics, this Lifting Supervisor Course is for you. It’s tailored for those who like to keep things moving, safely and efficiently. Course Objectives: 1. Understanding Regulatory Requirements: Familiarise participants with relevant regulations and industry standards governing crane operations, LOLER. Ensure compliance with legal requirements and best practices for safe lifting operations, BS7121. 2. Roles and Responsibilities of a Crane Lift Supervisor: Define the roles and responsibilities of a Lift supervisor within the context of lifting operations. Highlight the importance of effective communication, leadership, and decision-making skills. 3. Crane Safety Procedures: Provide an overview of crane safety procedures, including pre-operational checks, equipment inspection, and maintenance. Emphasize the importance of hazard identification, risk assessment, and mitigation strategies. 4. Lifting Plan Development: Guide participants in the understanding of the lifting plans tailored to specific lifting tasks and site conditions created by the Appointed Person(AP). Address factors such as load weight, size, shape, centre of gravity, and environmental considerations. 5. Site Safety and Hazard Awareness: Enhance participants’ awareness of potential hazards in the lifting environment, such as overhead power lines, unstable ground, and confined spaces. Implement effective measures to mitigate risks and ensure a safe working environment. 6. Communication and Coordination: Stress the importance of clear and effective communication between crane operators, riggers, signallers, and other personnel involved in lifting operations. Provide guidance on establishing communication protocols, using standardized hand signals, and conducting pre-lift briefings. 7. Emergency Response and Crisis Management: Equip participants with the skills and knowledge to respond effectively to emergencies and crisis situations during lifting operations. Implement emergency procedures, evacuation protocols, and contingency plans to mitigate risks and ensure personnel safety. 8. Practical Exercises and Case Studies: Provide hands-on lift supervisor training opportunities for participants to apply theoretical knowledge in practical scenarios. Analyse real-life case studies to identify lessons learned, best practices, and areas for improvement in crane supervision. Learning Outcomes By the end, you’ll be a pro at keeping sites safe, managing lifts, and leading teams. You’ll walk away not just with knowledge, but with practical skills that meet and beat industry standards. It’s about making you the go to lift supervisor everyone wants on their team. Course Logistics Ready to jump in? We’ve got training spots across the UK, with dates and times that fit your life. Signing up is a breeze, and we’ll guide you through any paperwork or prerequisites. It’s all about making it easy for you to get started. Conclusion: A crane supervisor course aims to empower participants with the expertise and confidence to lead safe and efficient lifting operations on construction sites. By focusing on regulatory compliance, safety procedures, lifting plan development, hazard awareness, communication, and practical training, the course prepares crane supervisors to fulfil their roles effectively and ensure the well-being of all personnel involved in lifting activities. Investing in crane supervisor training is essential for promoting a culture of safety, minimising risks, and achieving excellence in crane operations management. Crane Supervisor Training Available 7 days a week to suit your business requirements. VPT have a team of friendly and approachable instructors, who importantly have a wealth of knowledge of lifting supervision and the construction industry We have our own training centre conveniently located close to the M5 junction 9, In Tewkesbury. With its own purpose-built practical training area to simulate an actual working environment for the supervisor course. Our Lift Supervisor training and test packages are priced to be competitive. Discounts are available for multiple bookings We can send a fully qualified NPORS supervisor Tester to your site nationwide, for instance to reduce the amount of time away from work More courses: Polish your abilities with our dedicated Lift Supervision Training, Slinger Signaller Training, Telehandler Training, Cat & Genny Training, Plant Loader Securer, Ride-On Road Roller, Abrasive Wheel Training, Lorry Loader Training and Scissor Lift Training sessions. Learn the safe and effective operation of these vital machines, crucial for construction and maintenance tasks. Elevate your skills and career prospects by enrolling in our comprehensive courses today. Frequently Asked Questions 1. What is Lift Supervisor Training? Lift Supervisor Training is a specialised course designed to equip individuals with the knowledge and skills required to supervise lifting operations safely and efficiently. This training typically covers topics such as planning lifts, managing lifting equipment, and ensuring compliance with safety regulations. 2. Who should attend The Lifting Supervisor Course? This training is ideal for individuals responsible for overseeing lifting operations on construction sites, in warehouses, or any environment where lifting equipment like cranes are used. It’s particularly beneficial for site supervisors, managers, and anyone involved in the planning and execution of lifting operations to attend the NPORS Lift supervisor Course. 3. What certifications are available through the Lift Supervisor Training? Participants can obtain several Lift Supervisor certifications, including: NPORS Traditional card: Valid for 5 years, widely accepted in various sectors. NPORS card with CSCS logo: Recognised by major building contractors, with an initial RED trained operator card that can be upgraded to a BLUE competent operator card after completing relevant Crane Supervisor NVQ. 4. Is a health and safety test required for the NPORS Crane Supervisor Red operator card with the CSCS logo? Yes, to qualify for this card, you must have completed the CSCS operatives health and safety test within the last two years. 5 . How long is the certification valid, and what is the renewal process? The NPORS Traditional card is valid for 5 years. The NPORS card with the CSCS logo’s RED trained operator card is valid for 2 years, after which it can be upgraded to a BLUE competent Crane Supervisor operator card upon completion of relevant NVQs. The renewal process typically involves undergoing a refresher course or assessment to ensure continued competence. For those looking for a “NPORS Crane Supervisor Training near me,” our widespread operations make it convenient for you to access Vally Plant Trainings top-quality training no matter where you are in the UK
Level 1 and 2 combined, Guildford (in-person)
By Sign And Shine
Please note: This training is delivered by a third party Tutor NOT The Makaton Charity. For any workshop information, to book, or to make payment please contact the Tutor directly. Level 1 & 2 Combined Workshop (F2F) Level 1 Workshop is the starting point for your Makaton journey, with Level 2 building on the knowledge you gained in Level 1. It is recommended for people who need to use Makaton at home and in their work, to develop the communication skills of others. Content Level 1 & 2 training provides a practical introduction to the Makaton Language Programme and a wider understanding of learning and communication difficulties. The Workshop includes how to start using Makaton in everyday situations; immediate needs, home, familiar people, food, events, activities and objects. You will also discover hints and tips for effective signing and symbol use to maximise communication. Vocabulary will also be introduced which is ideal for the school environment and work places. You will begin to learn more abstract concepts such as spatial locations, attributes, pronouns and actions. Duration Level 1 & 2 combined face to face workshops comprise of a minimum of thirteen learning hours, (minimum of six and a half learning hours per level). Workshops generally will take place over two full day of training. Deliver method: Venue based. Maximum number of participants: 12 Accessibility Please indicate if you have any challenges or additional needs, so reasonable adjustments can be made to support your learning and participation. Entry criteria There is no entry criteria for this Workshop. Study materials You will receive a Participant's Manual, which includes the Makaton symbols and signs that you learn in the workshop. You will also be given a certificate of attendance. Please remember to keep your Level 2 training certificate in case you want to attend further Makaton training. Next steps After completing Level 1 & 2 combined training you can continue on your Makaton journey by attending Level 3 or Level 3 & 4 combined training. Instructions This is a combined Level 1 and 2 course. This venue is within walking distance to Guildford mainline and bus stations. The park and ride stops outside this venue and there are several car parks within a 5 minute walk. Refreshments provided throughout the day and plenty of shops and cafes nearby for lunch. Invoice option available for Organisations on booking page. Tutor is also available for in-house workshops - email laura@signandshine.co.uk Privacy Statement 📎 Privacy_Statement.pdf Terms And Conditions Updated 2022 📎 Terms_and_Conditions_updated_2022.pdf
Beginner's Candle Making Course in London
By Old Bexley Soap & Candle Co.
Learn to create top quality, fragrant, natural candles you can feel proud to burn in your home or gain enough skills to start a business. Paula, the award-winning founder of Old Bexley Soap & Candle Co., a master Chandler with years of experience is your host and teacher. You’ll be in a friendly, relaxed atmosphere and leave with two beautiful handmade soy wax candles - one large 30 cl and a smaller 12 cl.

REVIT ADVANCED ONE-TO-ONE COURSE
By Real Animation Works
Vray face to face training customised and bespoke.
Vray for Maya Essentials Course
By ATL Autocad Training London
Why Choose Vray for Maya Essentials Course? Learn V-Ray's power for stunning 3D visualizations. In design and architecture, it's essential for effective idea communication, offering an intuitive interface and efficient rendering, ensuring faster images and animations. Click here for more info: Website Duration: 10 hours Training Approach: 1-To-1 Sessions. Schedule: Customize your schedule by pre-booking a convenient hour of your choice, available Mon to Sat between 9 am and 7 pm. Module 1: Introduction to Vray for Maya (2 hours) Understand the significance of Vray and its integration with Maya. Installation and setup of Vray for Maya. Familiarize with the Vray interface, workflow, and materials overview. Module 2: Lighting with Vray (2 hours) Explore various lighting techniques in Vray. Understand different Vray lights and their settings. Master the creation and control of Vray sun, sky, dome lighting, and IES lights. Learn efficient lighting workflows with Vray. Module 3: Vray Camera (2 hours) Grasp Vray camera settings and exposure control. Work with Vray depth of field and create camera animations. Understand Vray frame buffer functionalities. Module 4: Vray Materials (2 hours) Explore Vray materials, realistic material creation, and custom material libraries. Utilize Vray material overrides for enhanced customization. Module 5: Vray Rendering and Post Production (2 hours) Dive into Vray rendering settings and techniques for both images and animations. Enhance post-production skills using Photoshop and Vray frame buffer. Learn the art of compositing Vray render elements and utilizing Vray denoiser. Additional Topics Covered: Global Illumination in VRay: Exploring techniques such as Irradiance Map, Light Cache, Quasi-Monte Carlo/Brute Force, and Environmental Lighting. Image Sampling: Understanding Fixed, Adaptive QMC, and Adaptive Subdivisions for optimal rendering quality. VRay Lights: Mastering Plane Light, Dome Light, Sphere Light, VRay Sun, VRay Shadow, Image-Based Lighting HDRI, and Object-Based Lighting. VRay Camera: Manipulating Focal Length, Film Speed, and Shutter Speed for precise camera control. VRay Materials: Customizing Diffuse Color, Reflection, Refraction, and Blurry Reflections for lifelike material creation. Rendering Test Scenes: Practical application by rendering interior and exterior scenes for a hands-on learning experience. V-Ray-Maya Trial https://www.chaos.com Master Vray for Maya to create high-quality renders. Apply various lighting techniques for realistic and visually appealing scenes. Control Vray camera settings and create dynamic shots. Create and customize realistic Vray materials for 3D scenes. Optimize rendering settings for high-quality output. Enhance renders with post-production techniques in Photoshop. Establish an efficient workflow with Vray in Maya. Gain hands-on experience and access valuable resources for further practice. Vray Proficiency: Master Vray tools, interface, and workflows in Maya for advanced 3D visualization. Advanced Lighting Skills: Expertise in diverse lighting techniques, including Vray sun, sky, and IES lights. Camera Control: Proficient manipulation of Vray camera settings, exposure, and animations. Material Customization: Create and customize realistic materials, utilizing custom libraries and overrides. Rendering Excellence: Skills in rendering images and animations, post-production, and compositing techniques. Global Illumination Mastery: Understand advanced global illumination methods for realistic scene lighting. Potential Jobs: 3D Lighting Artist: Specialize in illuminating scenes for films, games, or animations. 3D Visualization Specialist: Create realistic architectural or product visualizations. 3D Rendering Specialist: Focus on rendering high-quality images and animations. 3D Animator: Animate scenes within the context of realistic lighting. 3D Modeler: Develop detailed 3D models, ensuring realistic rendering. Visualization Consultant: Provide expert advice on visualization techniques. Freelance Vray Artist: Work independently on diverse projects, rendering scenes with exceptional realism. Expert Guidance: Receive guidance from certified tutors and industry professionals, benefitting from their deep expertise and practical insights. They will share valuable tips and techniques to enhance your rendering skills. Flexible Learning: Choose between in-person or live online sessions, tailored to your preference and location. Schedule training at your convenience, available Monday to Sunday, 9 am to 8 pm. Lifetime Assistance: Access lifetime email support, ensuring continuous guidance even after course completion. Our dedicated team is committed to addressing your queries and helping you overcome challenges. Unlock Your Potential: Enroll in our V-Ray for Maya Training Course to harness the power of this industry-leading rendering engine. Elevate your visual effects and animation skills, unleashing your creativity with stunning and lifelike renders.

1-day practical leather bag pattern cutting courseJoin us in our Oxfordshire Workshop (UK) for a day of learning and practical skills. Learn directly from Leathersmith and London College of Fashion Lecturer, Georgie Tym as she guides you through designing your own paper patterns from scratch to create 3D shapes for bags and accessories. Who is this course for? This 1-day practical bag pattern cutting course is ideal for all experience levels, from beginners to confident makers. A perfect introduction into some of the pattern cutting skills you’ll need to create and design your own bag patterns. Are you looking to: Start your own bag brand? Design your own bags? Understand the bag making process? Create bags at home to complete your own handmade wardrobe? Satisfy a general interest into the skills and techniques required to make your own bags? If you've answered yes to any of the above, then this is the course for you. What to expect Join Georgie to learn the basics of pattern cutting shapes for bags. This is the course for you if you’re ready to turn those bags you’ve been dreaming up and designing into 3-Dimensional tangible reality. This is the perfect taster day and leads directly onto the 1 week (5 day) pattern cutting course. What's included in the price? The course covers: - Professional methods and best practice - Basic pattern cutting techniques for shapes - Pattern design/ development and sequences - Hands on involvement and demonstrations. There are NO ADDITIONAL costs. Basic materials will be included.Time: The course runs from 10am - 4.30pm. There will be tea and coffee breaks throughout and a half hour break at lunchtime. Lunch will be provided, along with tea, coffee and snacks. Please let us know in the order notes of any dietary requirements. Cancellation policy Easy - Cancellation and a full refund can be obtained up to 2 weeks before the course starts About Georgie at Hands of Tym During training at Cordwainers, London College of Fashion in 2010 I learnt how to design, make and manufacture bags professionally. Following a varied career in Accessories design and development across many roles and international brands I set up Hands of Tym in 2016. The courses I offer are suitable for all, from experienced to total novice. Come along to learn something new, and design and make your own leather bag in a day.

Autodesk Maya Basic to Fundamentals Training
By London Design Training Courses
Training duration: 10 hrs. Click here for more info Method: 1-2-1, Personalized attention, Tailored content, Flexible pace, Individual support. Schedule: Personalized training experience with our flexible 1-2-1 sessions. Tailor your own schedule by pre-booking a convenient hour of your choice, available from Monday to Saturday between 9 am and 7 pm. Discover the world of 3D computer graphics and animation with our Autodesk Maya Basic to Fundamentals Training Course. Whether you're a beginner or aspiring artist, this comprehensive program equips you with essential skills in modeling, animation, and rendering. Benefit from interactive learning, experienced instructors, and the option to choose in-person or live online sessions. Enroll now to gain industry-standard knowledge and unleash your creativity in the field of animation and visual effects. Maya Basic to Intermediate Course Course Duration: 10 hours Course Outline: I. Introduction to Maya (1 hour) - Gain an insightful overview of Maya and its diverse applications - Familiarize yourself with the Maya interface and essential tools - Master navigation and viewport controls with ease - Learn the art of creating and managing projects proficiently II. Creating 3D Models (2 hours) - Lay a strong foundation in polygon modeling basics - Craft and shape basic objects and shapes adeptly - Refine and modify objects with precision and creativity - Unlock the art of constructing complex objects using extrusions and bevels III. Texturing and Materials (1 hour) - Venture into the realm of texturing and its significance - Create and skillfully apply materials to enhance visual appeal - Master the art of texture mapping and UV unwrapping techniques - Seamlessly import and incorporate textures and images into your projects IV. Lighting and Rendering (1.5 hours) - Illuminate your creations with fundamental lighting techniques - Set up cameras and compose visually captivating scenes - Master the art of rendering still images and dynamic animations - Explore diverse output options and file formats for professional results V. Animation (2.5 hours) - Embark on an enthralling journey into the world of animation - Effectively utilize keyframe animation and animation curves - Create and edit animation clips for seamless and captivating motion - Dive into the intricacies of rigging and animating a simple character VI. Special Effects (1 hour) - Unleash the potential of particle systems and dynamics - Create and manipulate mesmerizing fluid and fire effects - Craft and refine awe-inspiring special effects such as explosions and smoke VII. Intermediate Modeling Techniques (1 hour) - Elevate your skills with NURBS modeling essentials - Create and modify curves and surfaces with finesse - Dive into the world of crafting organic shapes using NURBS techniques - Employ sculpting tools to create high-resolution and detailed models VIII. Conclusion and Next Steps (0.5 hours) - Recap the wealth of knowledge from the course content - Discover valuable tips and resources for further learning and growth - Engage in a dynamic Q&A session and provide valuable feedback